VMware exits aren’t just about license bills anymore. They’re about control, predictability, and keeping your platform stable when contracts change. A good proxmox migration plan treats migration like a product release, with scope, testing, and a rollback path.
In March 2026, Proxmox VE is a mature target for SMB and mid-market teams, and it’s also showing up more in larger environments. Proxmox VE 9.1 adds migration-friendly improvements, including a stronger VMware import path and broader snapshot support across common storage types. The goal is simple: move workloads with low risk, keep downtime short, and avoid surprises after cutover.
Step 1: Set scope, inventory, and the go or no-go decisions
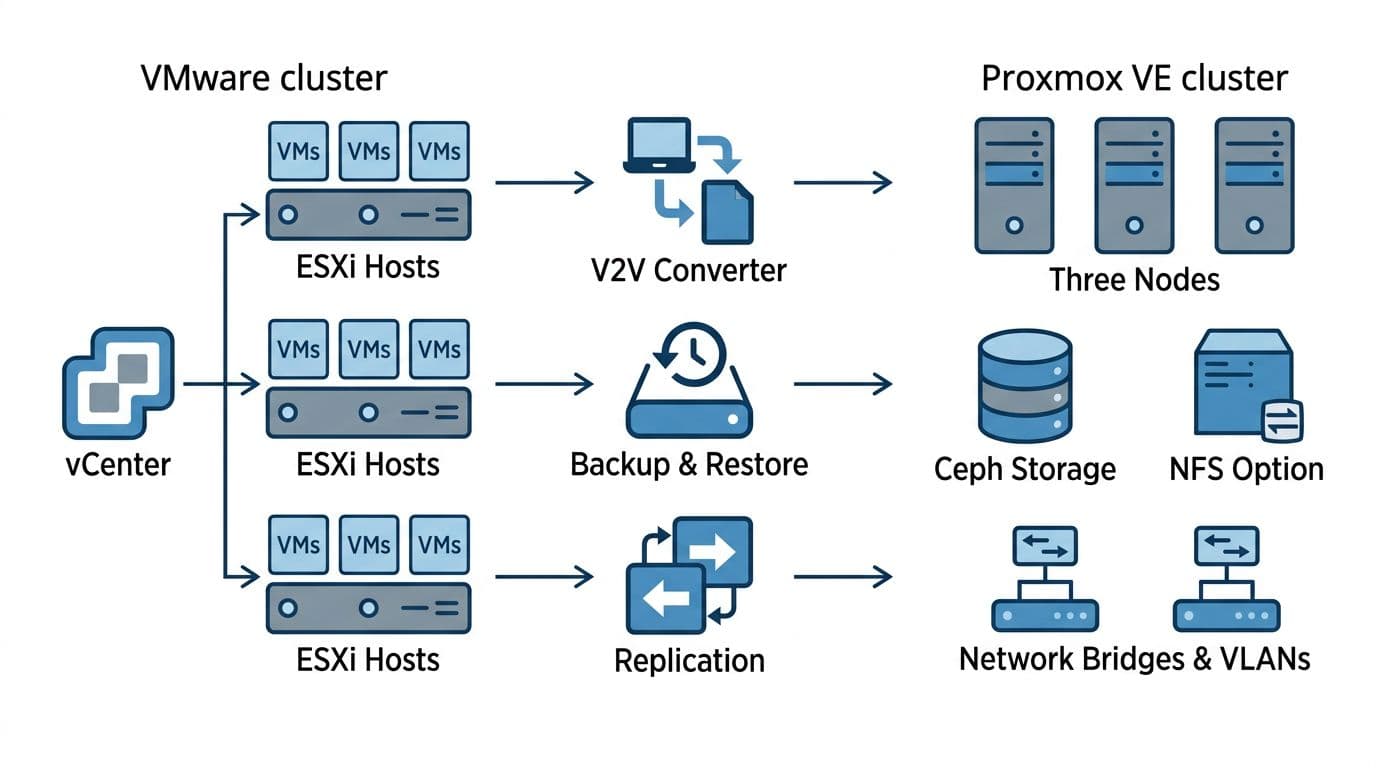
Start by deciding what “done” means. Is the goal to shut down vCenter by a date, or to migrate only production? That answer changes everything, including hardware spend and timeline.
Next, build an inventory you can actually execute on. Pull data from vCenter, CMDB, backup tools, and app owners. If you only do one artifact well, do this one.
Sample VM inventory fields (copy into a spreadsheet):
- App/service name, owner, and escalation contact
- VM name, guest OS, uptime expectations, maintenance window
- CPU/RAM, average and peak usage, disk sizes, datastore
- Network needs (VLANs, static IPs, VIPs, load balancer ties)
- Dependencies (DB, AD, DNS, NTP, shared files, middleware)
- Special requirements (TPM, encryption, USB, GPU, latency-sensitive)
- Backup/RPO/RTO, retention, and restore test status
- Migration method (Import, V2V, rebuild, retire) and risk score
Then lock in decision points early, while you still have time to change the plan.
Key go or no-go decisions:
- Storage model: Ceph vs shared NFS/iSCSI/SAN (you can mix, but pick a default).
- Downtime tolerance: cold cutover, short outage, or parallel run.
- Windows driver plan: VirtIO adoption, TPM use, and how you’ll validate boot.
- Operational model: who owns Proxmox patching, backups, and on-call.
If you want a practical checklist for common migration paths, compare a few community write-ups such as ByteRack’s ESXi to Proxmox VE migration walkthrough and refine it into your internal runbook.
Treat each VM like a change request. If you can’t describe rollback in one paragraph, you’re not ready to migrate that workload.
Step 2: Design the Proxmox VE target (cluster sizing, storage, network, backups)
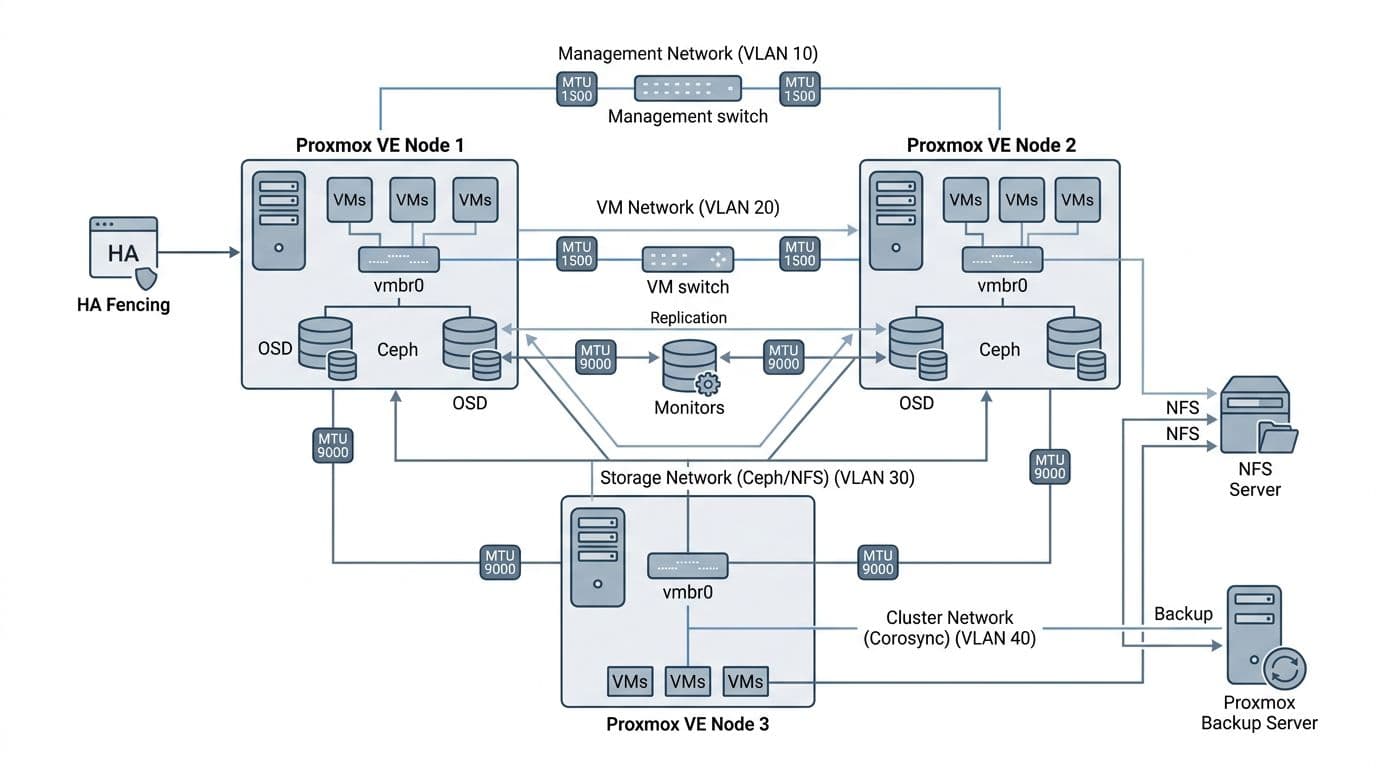
A stable Proxmox design is boring on purpose. Favor repeatable node builds, clear failure domains, and simple networking.
Cluster sizing rules that reduce pain
Start with three nodes minimum for quorum and HA. If you must run two nodes, plan a third vote device (qdevice) and be realistic about maintenance risk. Size CPU for peaks, but size RAM for reality, because memory contention hurts fast.
As a baseline, many teams target N+1 capacity for production clusters. That means if one node fails, the rest can run critical VMs without panic. Also reserve headroom for backups, scrubs, and live migration bursts.
Storage choice: Ceph vs shared NFS/iSCSI
Ceph fits when you want scale-out and HA storage inside the cluster, and you can dedicate fast disks and a strong storage network. Shared NFS/iSCSI or a SAN fits when you already have reliable shared storage and want fewer moving parts on day one.
For a grounded discussion of tradeoffs (performance, failure modes, and ops effort), see this community comparison: Ceph vs SAN vs NFS for Proxmox storage.
Networking: bridges, VLANs, and MTU
Keep networks separated by intent:
- Mgmt: Proxmox GUI and SSH access.
- VM: guest traffic, VLAN-aware bridges help here.
- Storage: Ceph replication, iSCSI, NFS, backup traffic.
If you raise MTU to 9000 for storage, make it end-to-end, including switches. Mixed MTU causes weird drops that look like “random” migration failures. On Proxmox, you’ll commonly use Linux bridges (for example, vmbr0) and bonds for uplink redundancy.
Backup strategy with Proxmox Backup Server (PBS)
Plan backups before the first migration wave. Use PBS for dedupe, encryption, and faster restores, then run restore tests as a gate. Don’t skip this because you “still have VMware backups.” After cutover, you need a native recovery path.
VMware features mapped to Proxmox equivalents
This quick mapping helps set expectations with app owners and leadership.
| VMware concept | Proxmox VE equivalent | Notes |
|---|---|---|
| vMotion | Live migration | Works best with shared storage or well-sized Ceph. |
| DRS | No direct 1:1 | Use HA, placement rules, and monitoring driven actions. |
| vSAN | Ceph (optional) | Different tuning and failure behavior, plan training. |
| vSphere HA | Proxmox HA manager | Quorum matters, see Proxmox HA clustering concepts. |
| Veeam style backups | PBS or third-party | Validate restores, not just backup jobs. |
Step 3: Pilot, migrate in waves, and cut over (30/60/90 days)
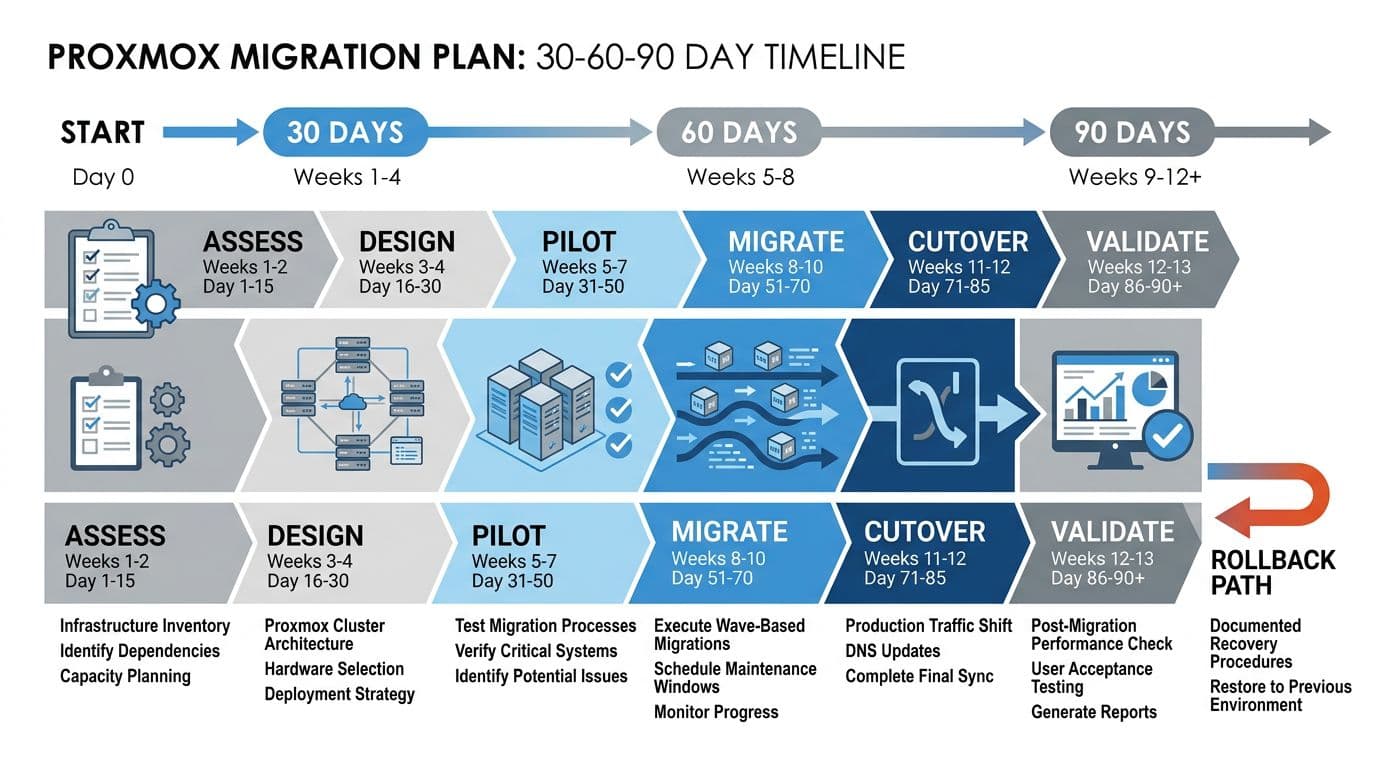
A pilot isn’t a mini-migration. It’s where you prove your assumptions, then fix the runbook while the stakes are low.
A realistic 30/60/90-day timeline
- Days 1 to 30 (Assess and build): finalize inventory, procure hardware, build the Proxmox cluster, set up PBS, and define VLANs, IPAM, and firewall rules.
- Days 31 to 60 (Pilot and harden): migrate 5 to 15 low-risk VMs, validate monitoring, patching, backup restores, and HA behavior during node reboots.
- Days 61 to 90 (Waves and cutover): migrate by dependency groups, then retire VMware in stages after stability holds.
Migration methods and when to use them
Proxmox VE 9.x includes an import path that can pull VMs from ESXi over the network in many cases. Still, keep multiple options ready:
- Import for straightforward VMs when networking and permissions cooperate.
- V2V conversion when you need more control (for example, converting VMDKs). A common building block is
qemu-img convert -p -f vmdk source.vmdk -O qcow2 disk.qcow2. - Backup and restore when you want a clean cut and strong rollback boundaries.
For a step-focused view of the typical conversion steps and pitfalls, TechWrix has a practical primer: migrate VMs from VMware to Proxmox VE.
Wave plan table (sample)
Use this table to keep the team aligned on sequence and rollback.
| Wave | Workloads | Method | Maintenance window | Acceptance gate | Rollback trigger |
|---|---|---|---|---|---|
| 0 | Test, tools, jump hosts | Import or rebuild | Business hours | Backups restore, monitoring alerts | Any unexplained host instability |
| 1 | Low-risk internal apps | Import or V2V | 1 to 2 hours | App login, DNS, backups pass | Boot failure or perf drop |
| 2 | Core shared services | V2V + planned outage | 2 to 4 hours | Replication, auth, and batch jobs pass | Auth failures or data mismatch |
| 3 | Customer-facing and revenue | Parallel run then cut | Off-hours | Load tests, error rates stable | SLO breach or incident |
Acceptance criteria (keep it simple)
Before you mark a VM migrated, require:
- Successful reboot on Proxmox, with guest tools plan documented.
- Network validation (IP, routes, VLAN, firewall rules).
- Backup success to PBS and a tested file or VM restore.
- Performance sanity check versus baseline (CPU ready style issues become scheduling issues).
- Owner sign-off for the app, not just infrastructure.
Rollback strategy that teams can execute
Rollback works best when it’s boring. Keep VMware powered on for each wave until you pass acceptance for a full business cycle. During cutover, switch one layer at a time, usually DNS or load balancer first, then application traffic. If you hit a trigger, revert DNS or VIPs, power the old VM back on, and document the failure before attempting again.
Conclusion
Exiting VMware in 2026 goes smoothly when you treat it like a staged release, not a weekend project. Build your inventory, pick storage and network defaults, then prove backups and HA in a pilot. After that, run waves with clear acceptance gates and a rollback you can execute under stress. A disciplined proxmox migration plan turns a platform change into a controlled operation, and it keeps your team in charge of the outcome.

